August 28, 2023
Version Control your ML Workflow Using PyXet: Part 1

Srini Kadamati

Model Development Is Messy
Building machine learning products and services is hard. First you need to hire a talented team of data scientists and machine learning engineers, who are incredibly hard to find. Then you pair them with the engineering organization to get them the tools and services they need to be productive. If all goes well, the team glues together a complex workflow where state exists in many, many different places.
Gather.AI is a drone-powered inventory logistics monitoring solution and machine learning is central to their product. Here’s a diagram that describes their ML model development workflow before they incorporated XetHub.
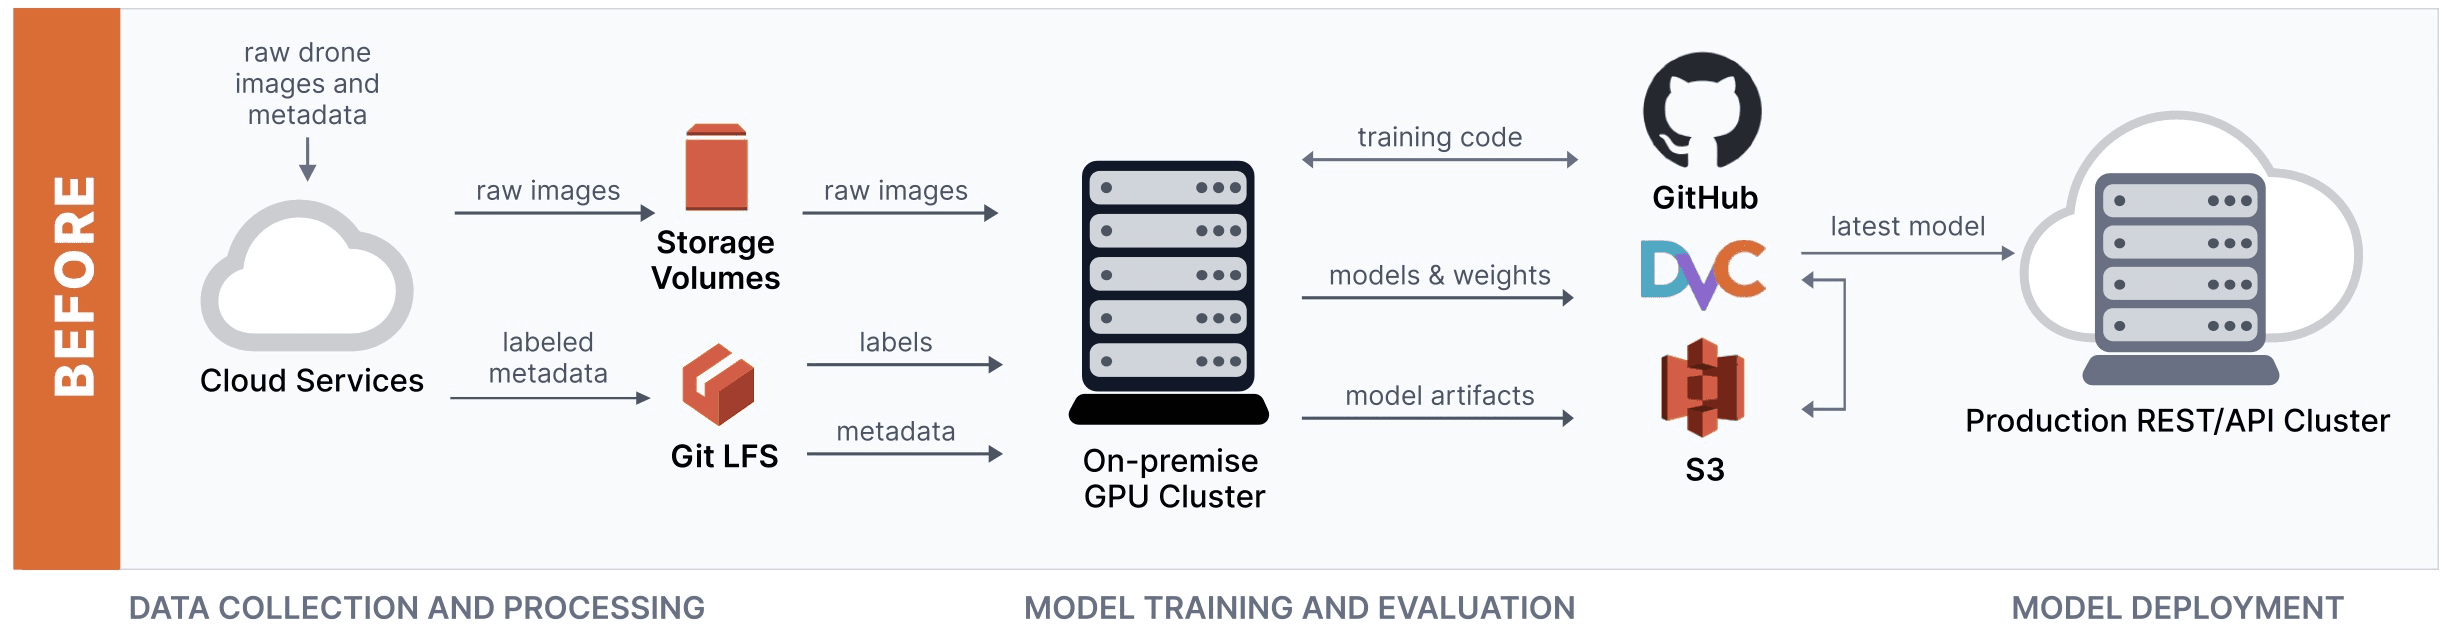
The team at Gather.ai found this workflow incredibly clunky. Each time changes were made, they had to coordinate version changes in a handful of different systems, like Git LFS, S3, and DVC. The founders of XetHub witnessed very similar challenges during their time at Apple and decided to build a product to streamline the model development workflow.
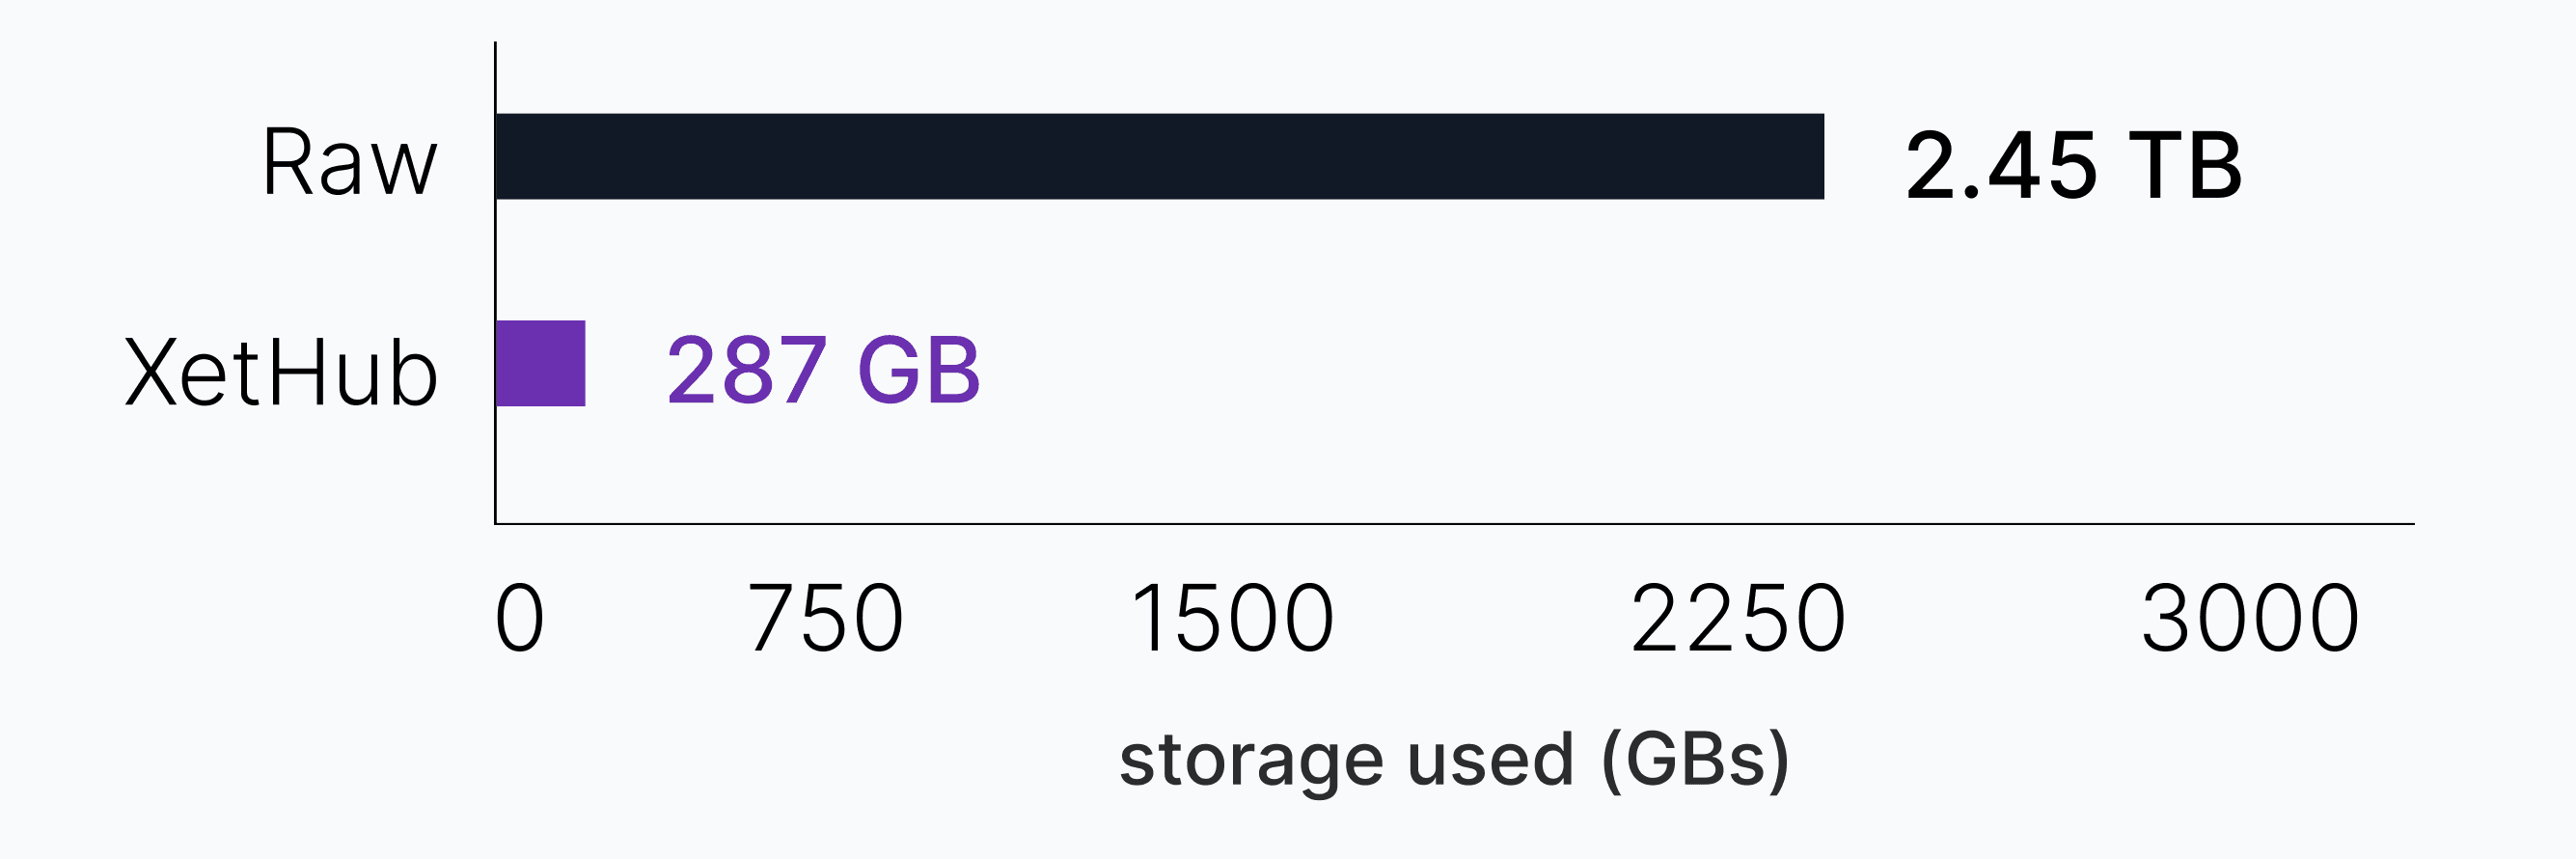
XetHub is a storage platform that enables version control of ML data and models. The platform is built using a novel, content-aware deduplication system called MerkleDB. While git usually treats small changes to datasets as new entire files, XetHub is smart about capturing just what changed between 2 versions of the same dataset whenever possible.
For example, storing 50 versions of the CORD-19 dataset requires 2.45 TB as raw files but only 287 GB(89% less storage) using our content deduplication system built into XetHub.
The Gather.ai team simplified their ML development stack by replacing Git LFS, AWS storage volumes, DVC, and S3 with just XetHub:
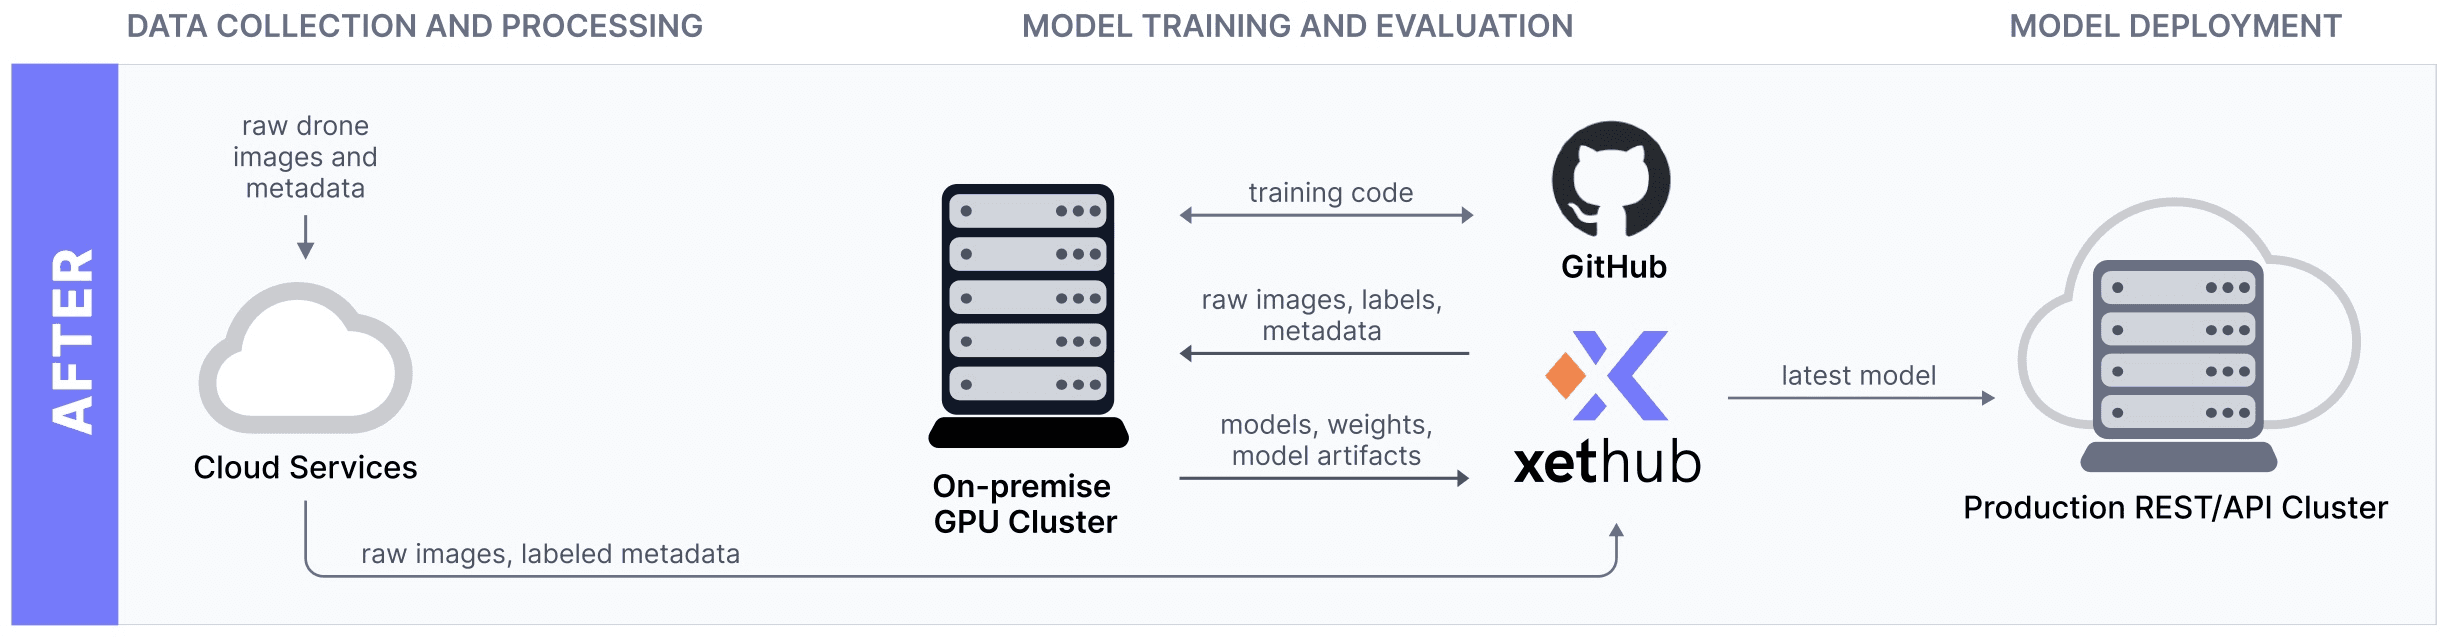
They could rely on XetHub as a single source of truth for the versioning of all their core ML models and datasets, instead of having to juggle multiple systems.
In this post, we’ll focus on how you can add your files to XetHub from S3 to experience the benefits for yourself. By the end of this post, you’ll know how to:
explore the universe of XetHub repos from just your command line
mount massive XetHub repos to your machine in seconds
stream datasets just-in-time for your local programs
Getting Started with XetHub & PyXet
XetHub.com is the service we offer and PyXet is our Pythonic interface into XetHub. Our free tier is generous, enabling you to create unlimited public repos with no cap on the repo size or collaborators. Check the pricing page for up-to-date information on all our tiers.
First, start by creating a free account over at XetHub.com.
Navigate to https://xethub.com/ and click Sign in with GitHub.
When on the Quick Start page, click Python & CLI to be taken to the PyXet installation and setup instructions.
By the end, your machine will have the PyXet library installed and your personal access token available to the library.
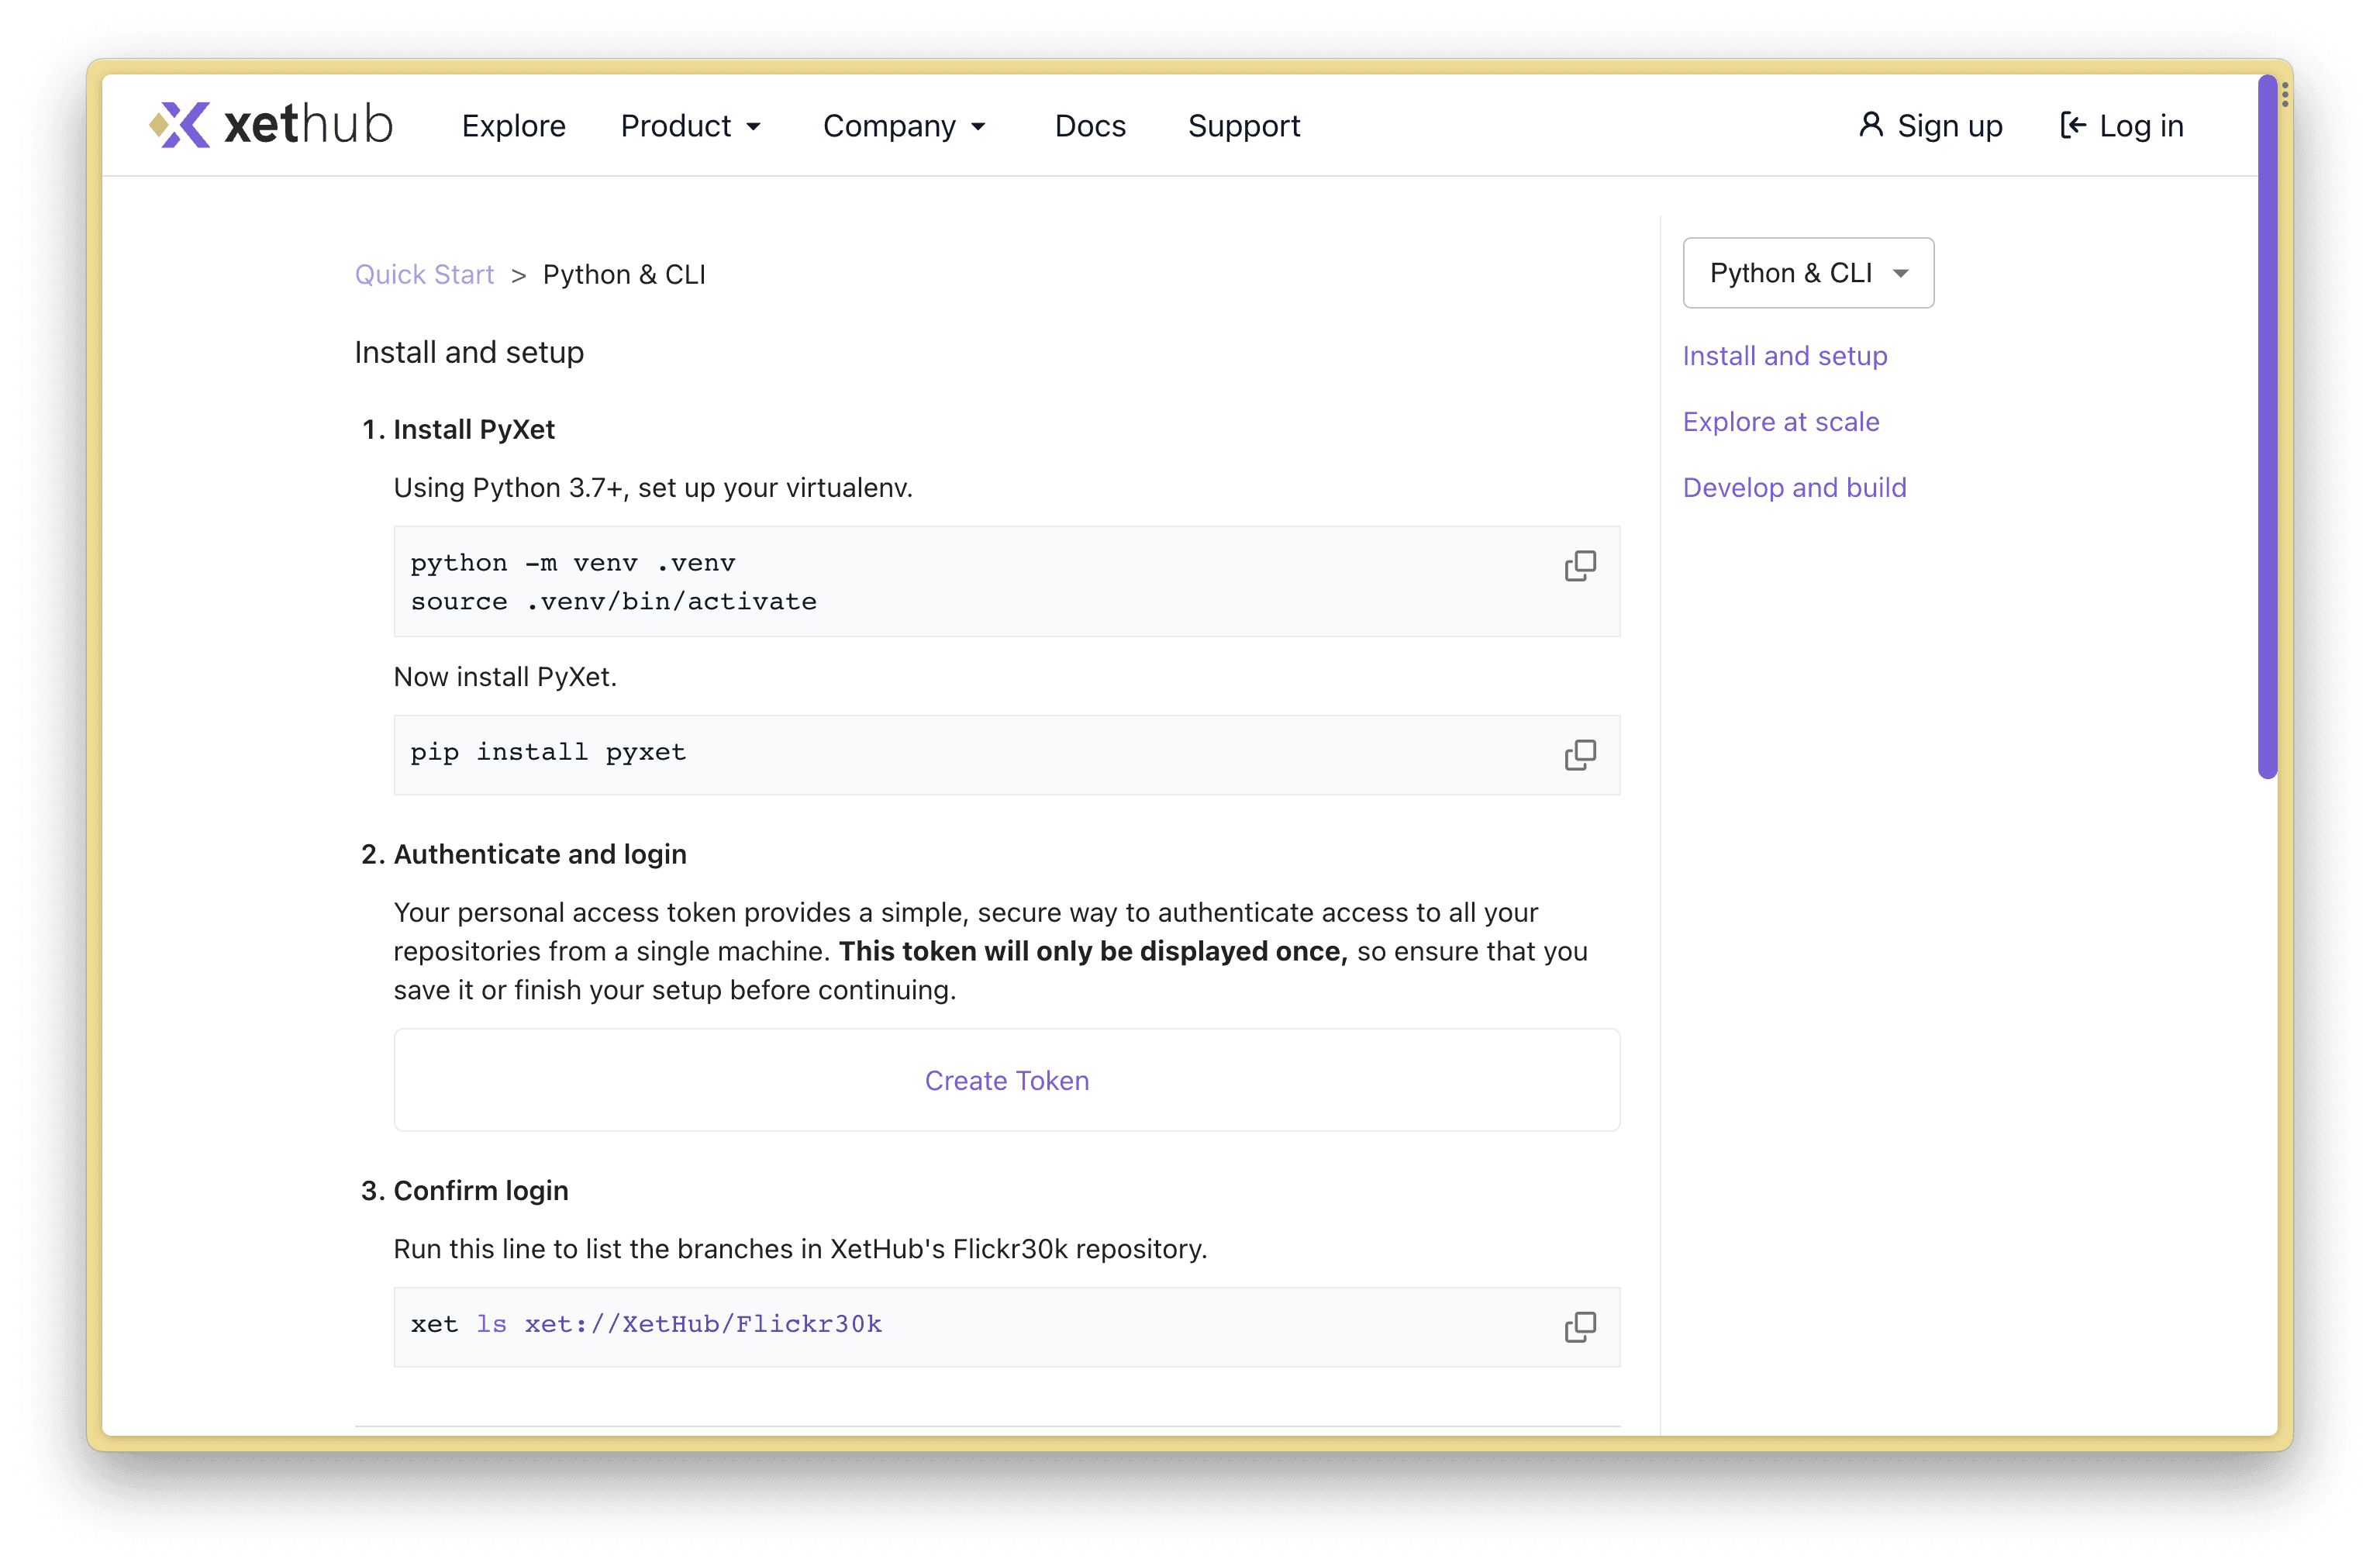
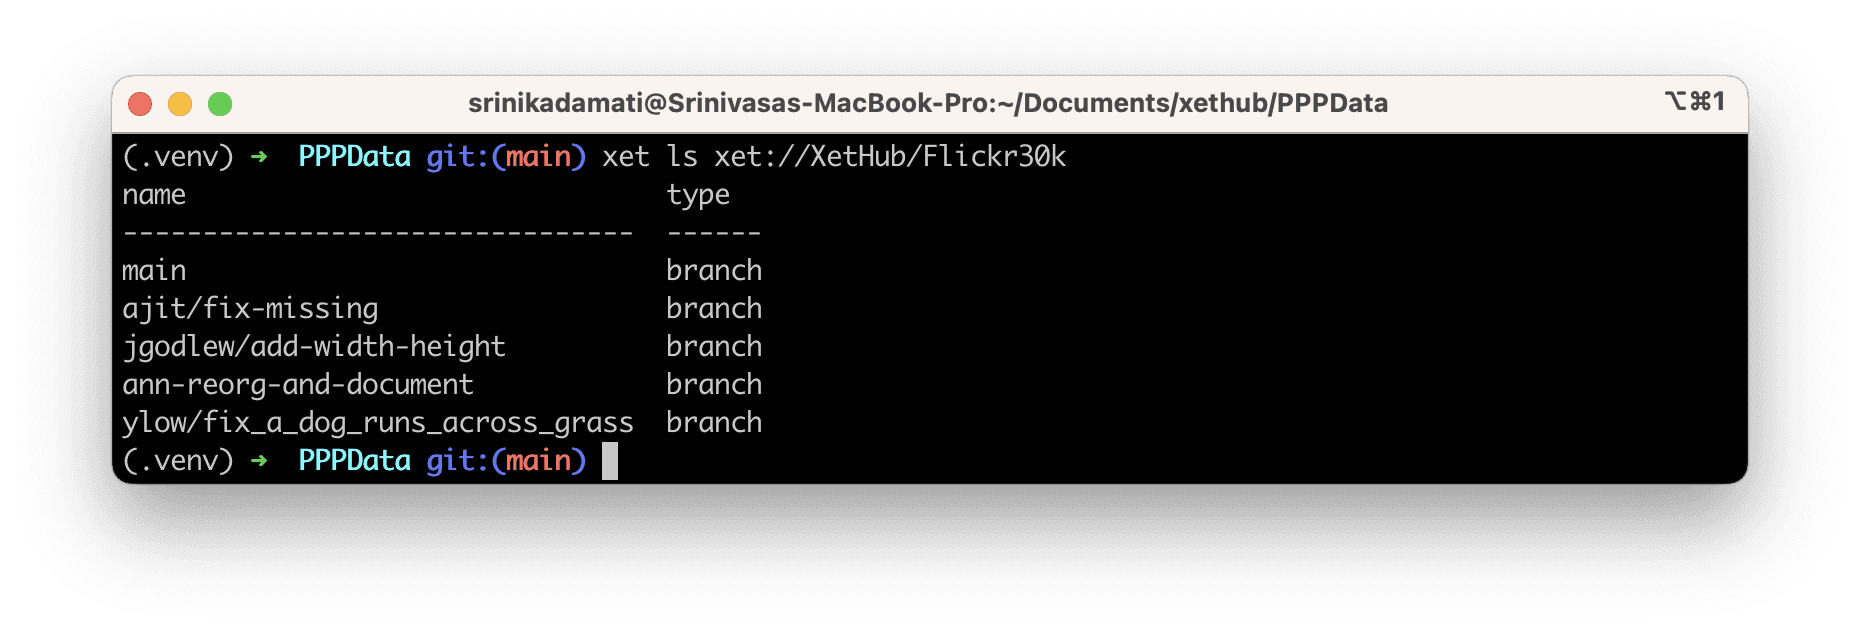
Once you can run xet ls xet://XetHub/Flickr30k successfully, then you know that you’re authenticated with XetHub and have the right libraries installed.
Now that we have the PyXet library installed, let’s start exploring data from our machine.
Navigating Repos using the xet CLI
One of the fastest ways to explore a specific XetHub repo is to use the xet CLI.
You can view all of the repos that live under your user namespace by running xet ls xet://<your_username> and paying close attention to the casing in your username:
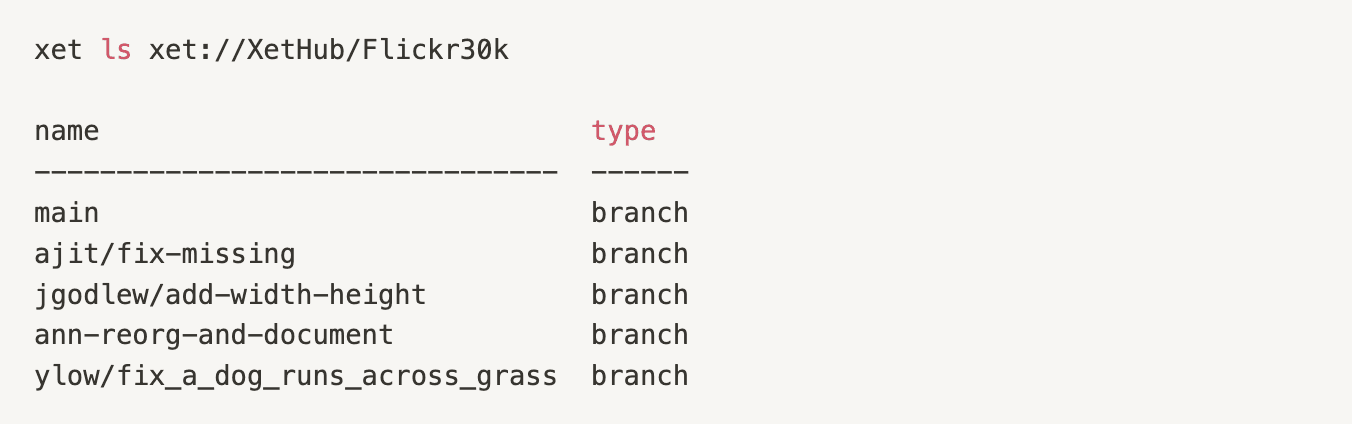
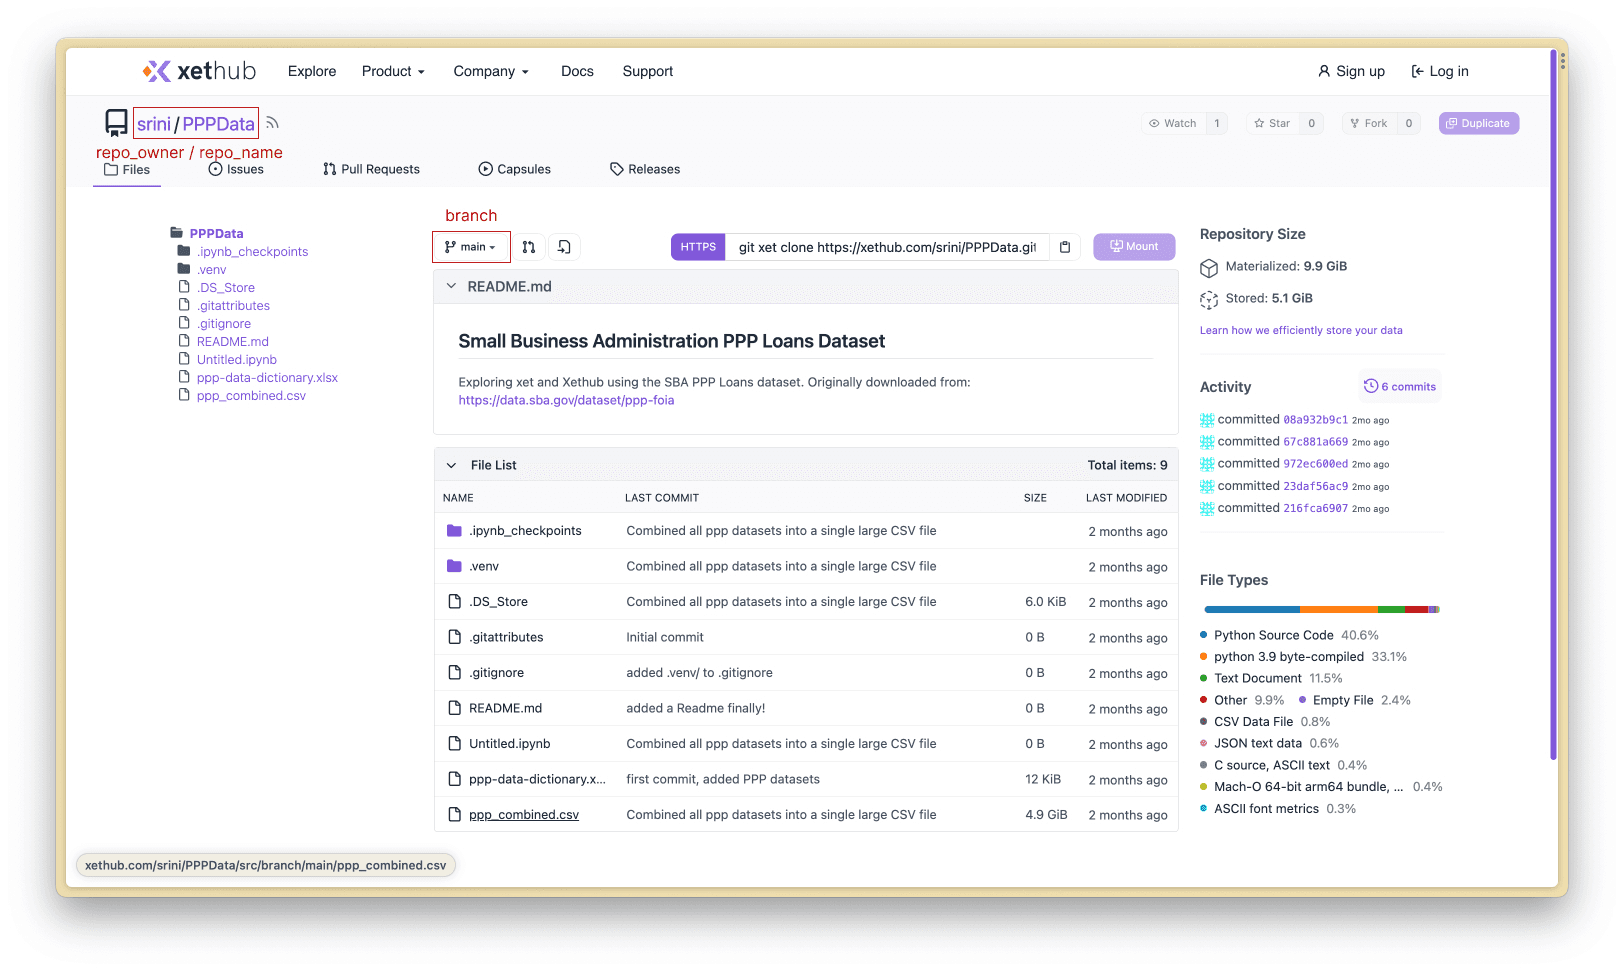
Let’s explore what’s in the Flickr30k repo using xet ls xet://XetHub/Flickr30k . Running this will return all of the available branches. Similar to git, branches in XetHub can each contain a different history of changes.
Next, adding the branch name (main) returns the files & folders in the root director of our repo for that branch.

The main branch contains 3 files and a directory. Let’s go one level deeper into the directory to see what’s inside.
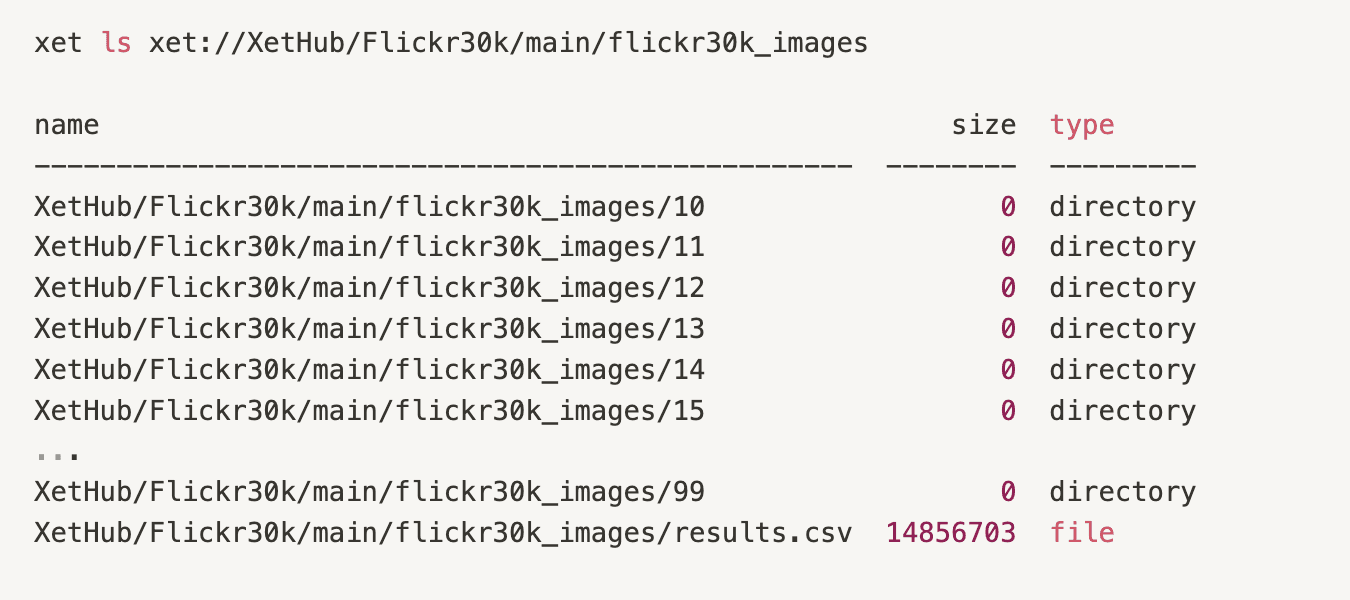
We see a long list of directories and a file. With the xet cli, you can see and list your projects using a familiar syntax: xet ls xet://<your_user>/<repo_name>/<branch_name>
Next, let’s learn how to preview large CSV files from XetHub repos.
Previewing Datasets Locally
During the data exploration phase, you often want to browse and load lots of disparate datasets quickly to identify the most relevant ones. In the following code snippet, we load the first 10 rows of a 5GB CSV file on XetHub in just a few seconds without downloading the entire file to our computer.
You should see the following output:
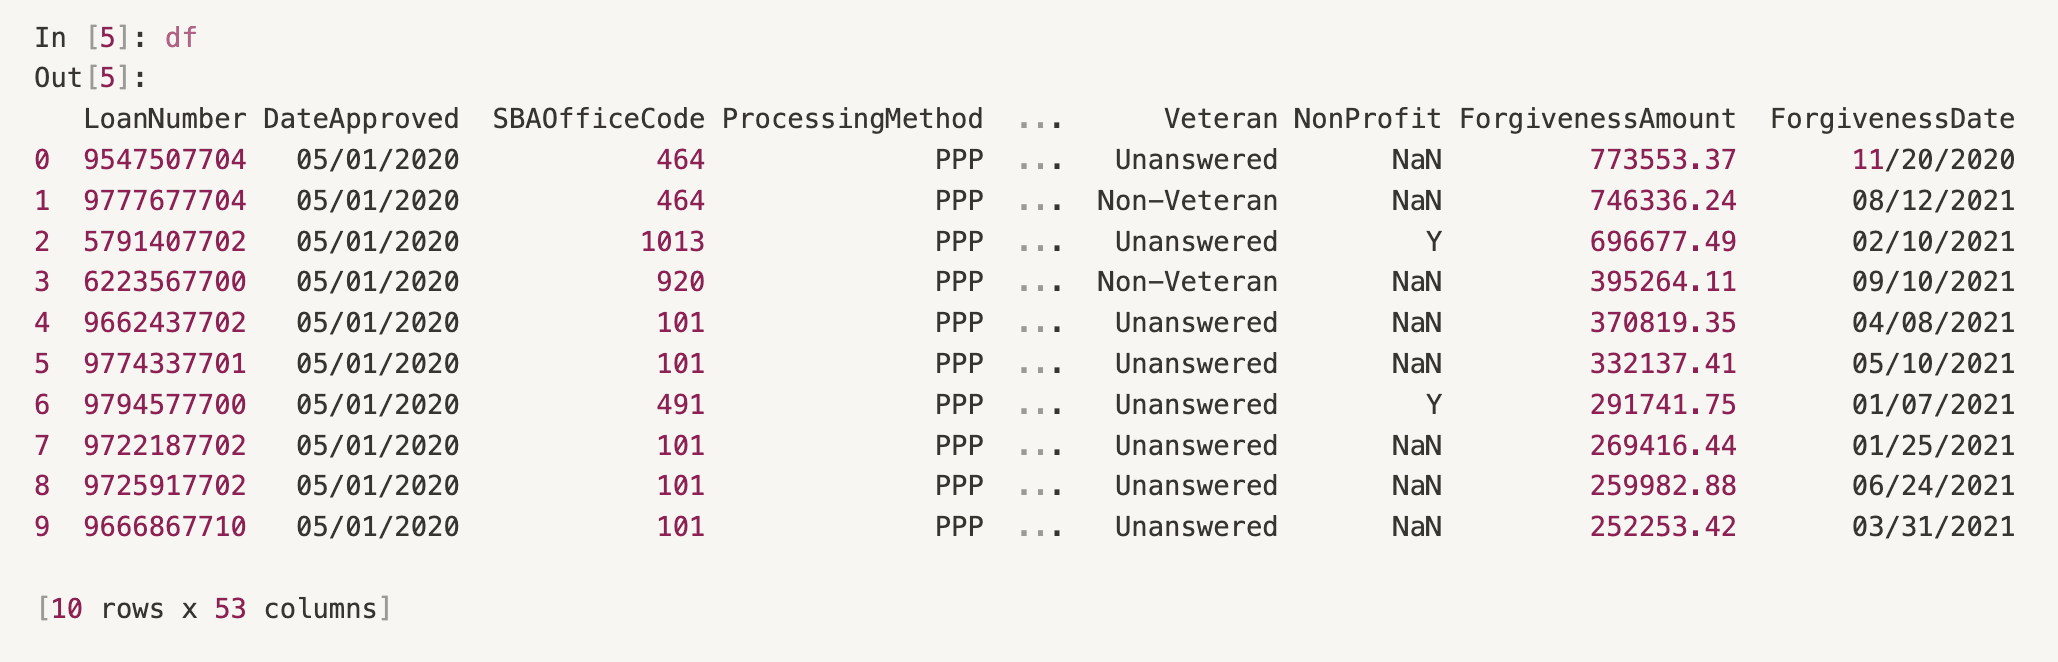
This works because CSV files can be read line-by-line from the first row and PyXet is able to fulfill this request on behalf of the pandas code. Here’s a breakdown of the URL we passed to pd.read_csv():
xet://<repo_owner>/<repo_name>/<branch>/<path_to_file>
repo_owner: srini (my XetHub username)
repo_name: PPPData (my XetHub repo)
branch: main (main branch)
path_to_file: ppp_combined.csv in the root directory of the repo
All of this information is available on the XetHub repo page.
Analyzing Remote Parquet Datasets Locally
Reading the first 10 rows of a remote CSV file is pretty neat, but we can do better than that. If your data is in the parquet format, we can issue queries against it using DuckDB!
If you don’t have duckdb installed, first install it by following the instructions for your operating system here. You can test your installation and the availability of duckdb in your PATH by running which duckdb.
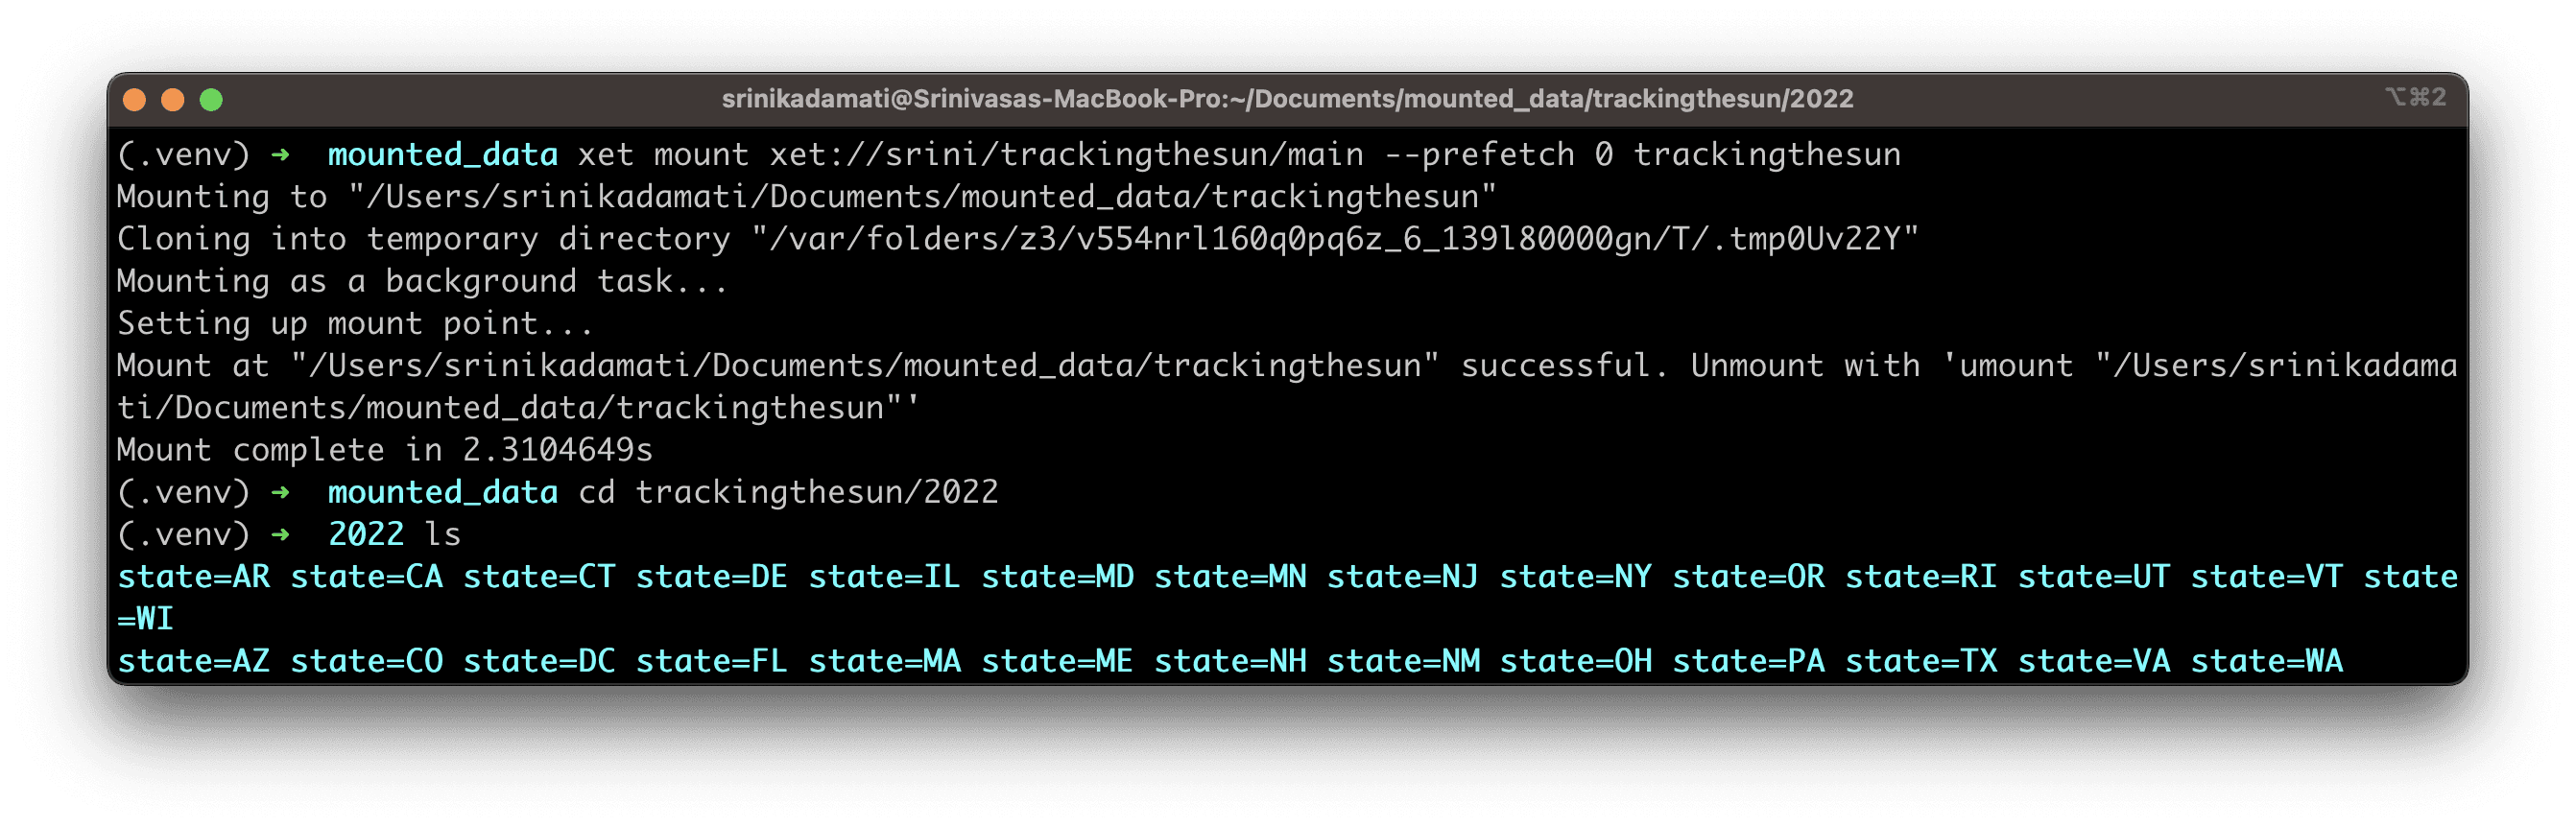
Next, let’s mount the main branch from my pppdata repo with the following flag added: --prefetch 0 . This is the recommended way of mounting repos when you want to optimize for efficient random access.
Instead of downloading the entire repo to your machine (which could take a while for large repos), this command virtually mounts all of the files & folders within it in just a few seconds. As specific files are requested, the tool will quietly stream and cache those files just-in-time.
Now, let’s try running some queries:
Here are the results:
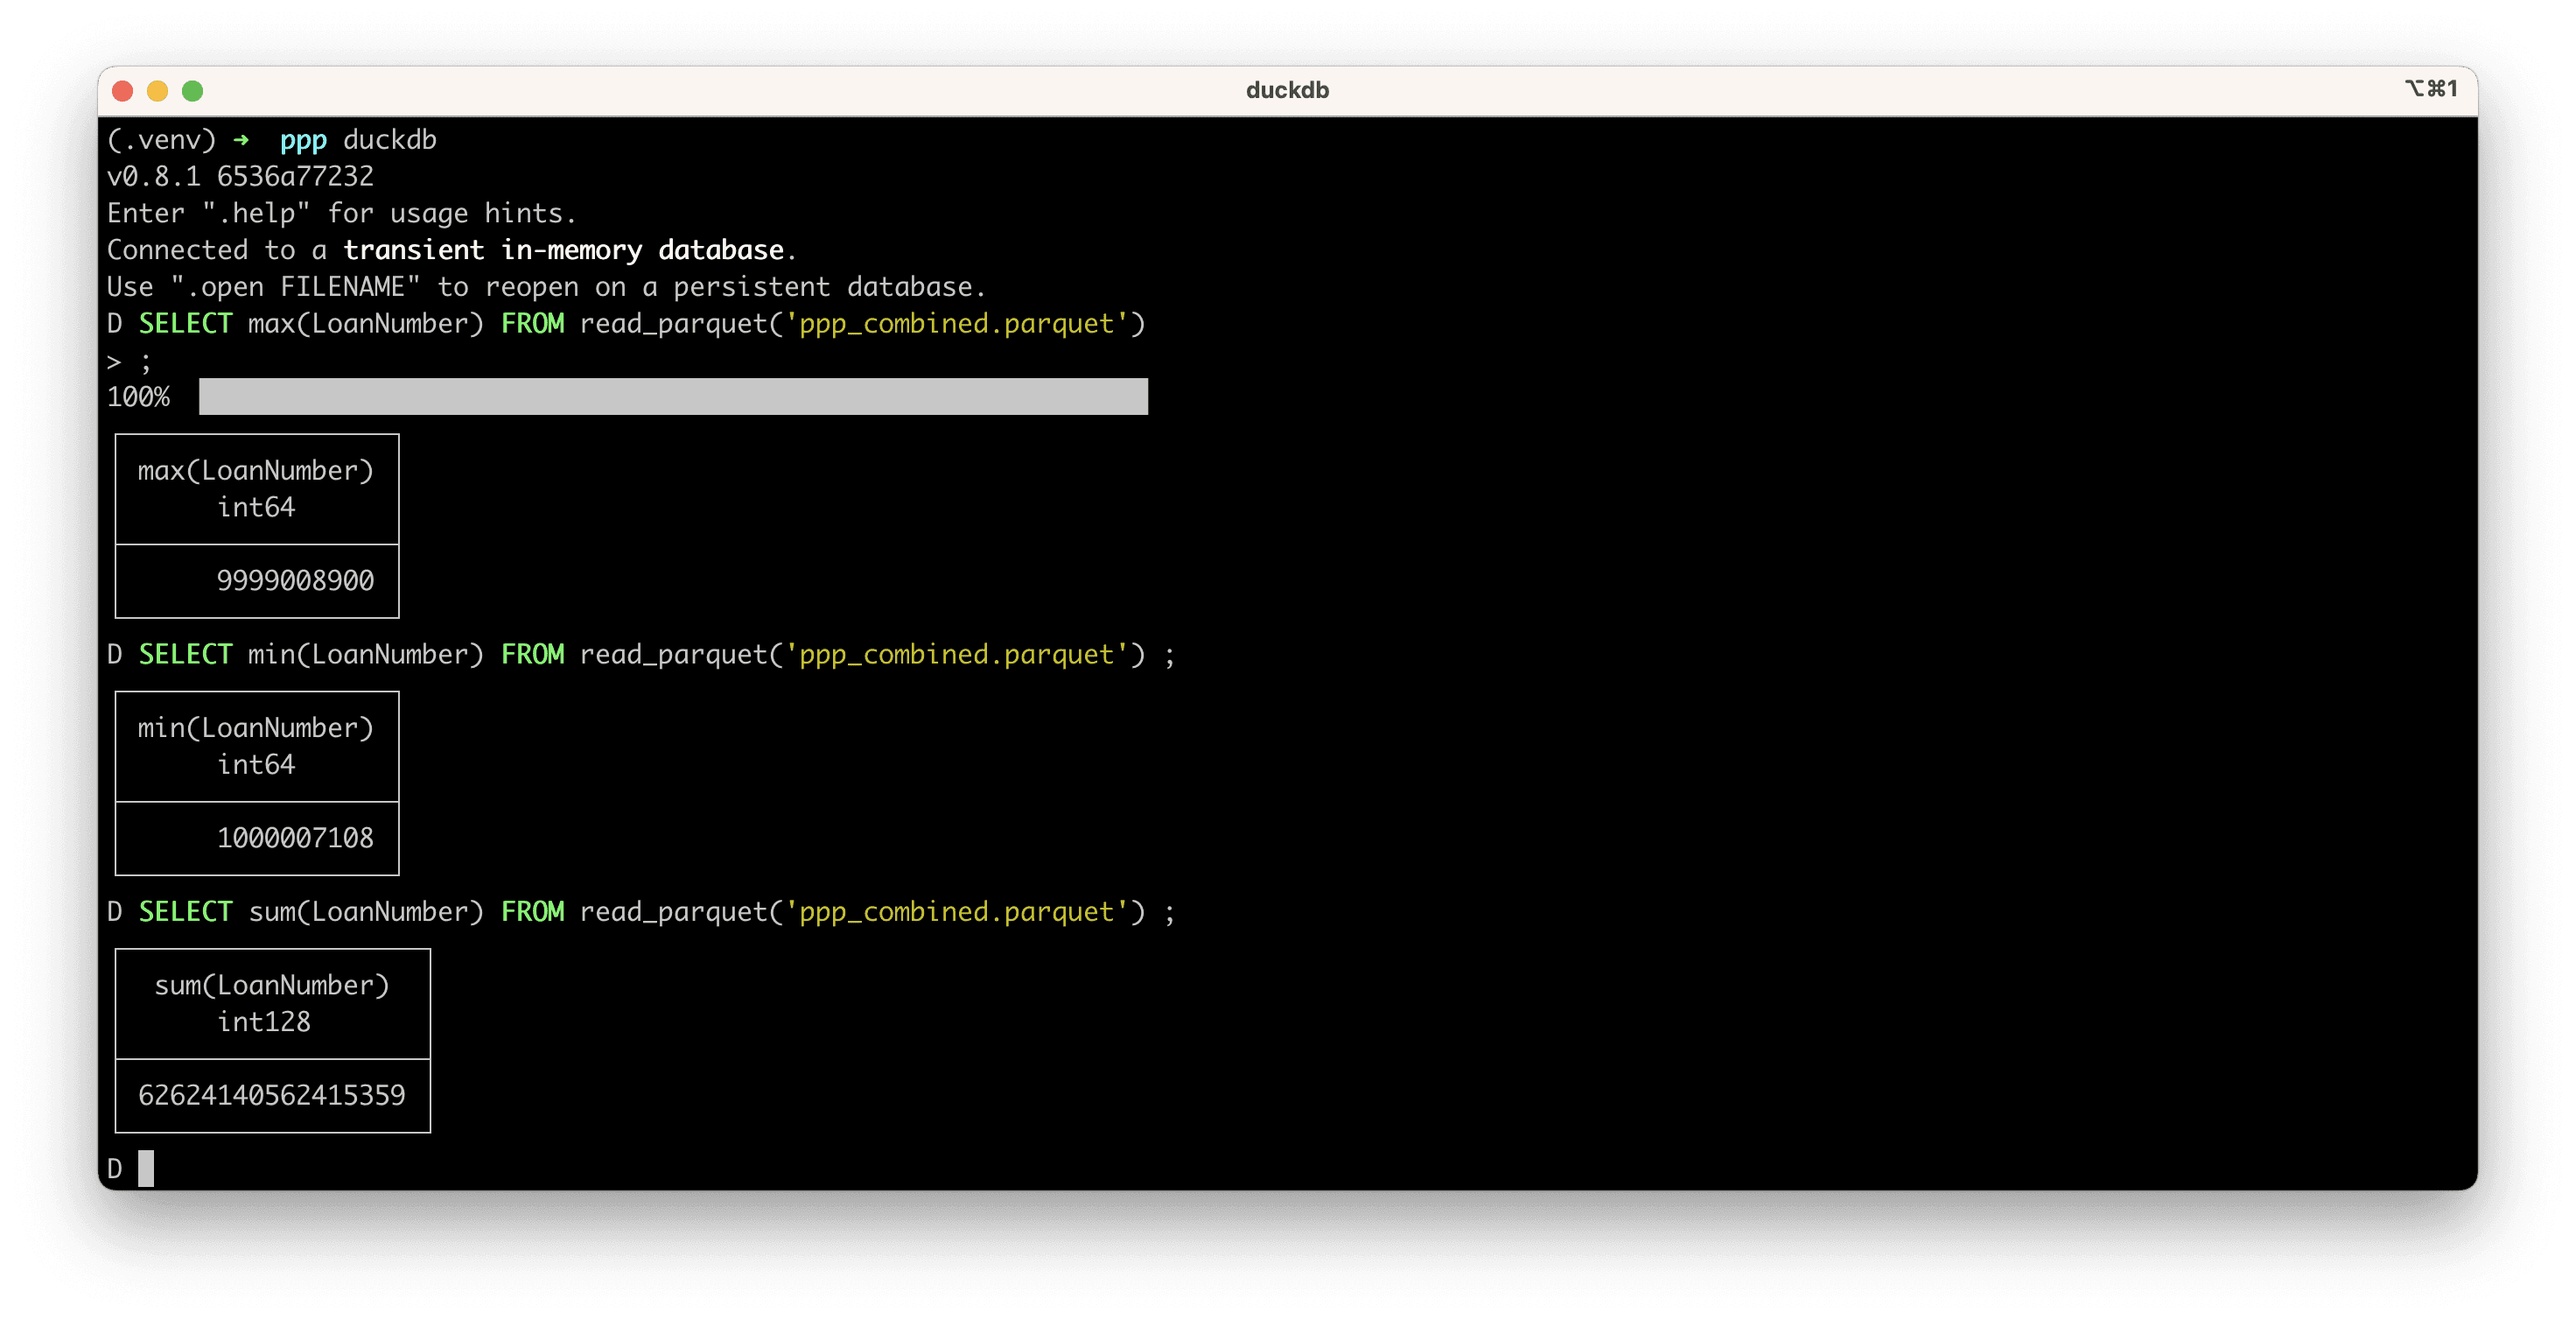
Duckdb knows how to request just the blocks it needs to service our query (basically just the LoanNumber column) without downloading the entire dataset. While the first query takes the longest (~2 seconds), subsequent queries are instant if you’re using the same column. This scales exceptionally well to terabyte sized parquet files as well.
You can learn more about all the ways duckdb can query parquet files in this helpful documentation article.
Add Your Data Into XetHub: Importing Data From S3
To introduce the power of XetHub in a low friction way, all of the examples so far have utilized data from existing public XetHub repos in the examples. Next, let’s explore how you can get your data into XetHub from a blob store like AWS S3.
0. AWS & AWS CLI Pre-requisities
Valid AWS user: First, make sure you have a valid AWS user that has an attached AmazonS3FullAccess or AmazonS3ReadOnlyAccess policy at a minimum.
Install awscli: Install the AWS command line tools (named awscli) for your platform by following the instructions here.
Configure awscli with credentials: Create access keys for this AWS user, run aws configure to configure your CLI to connect to AWS, and finish the 4 step process in the CLI. You can find more documentation here.
Test awscli with your private S3 bucket: Try running aws s3 ls and see if your S3 root-level directory is displayed.
Test awscli with a public S3 bucket: You can also try running the following command to test the command line with a public data bucket: aws s3 ls s3://oedi-data-lake/tracking-the-sun/ . This should return 2018, 2019, 2020, 2021 and 2022 folders (at the time of writing)
1. Creating a XetHub repo
Run the following command to create a private repo: xet repo make --private xet://<your_user>/<repo-name>
2. Copy a single S3 file into your XetHub repo
Run this command to copy a single S3 file into your newly created XetHub repo: xet cp s3://bucket/path/to/file xet://<user>/<repo-name>/main/file
Here’s an example call with a public dataset if you want to try this first: xet cp s3://oedi-data-lake/tracking-the-sun/2022/MA/part-00167-95a7244f-8c05-4b86-b28f-bc28df06bdd1.c000.snappy.parquet xet://<your_user>/<repo_name>/main/2022/MA/part-00167-95a7244f-8c05-4b86-b28f-bc28df06bdd1.c000.snappy.parquet
3. Copy a full S3 directory recursively into your XetHub repo
Run this command to copy all the folders and contents recursively within the S3 path you specify into your newly created XetHub repo: xet cp -r s3://bucket/path/ xet://<user>/<repo-name>/main
Here’s an example call with a public dataset if you want to try this first: xet cp -r s3://oedi-data-lake/tracking-the-sun/2022/ xet://<your_user>/<repo_name>/main/2022/
Check out our documentation article on importing data from S3 for more ways to use this functionality.
All Together Now
To wrap up this post, let’s combine all of the techniques we learned in concert to create a repo, import this public dataset, and run an analytical query. Here's a video that showcases this in under 2 minutes.
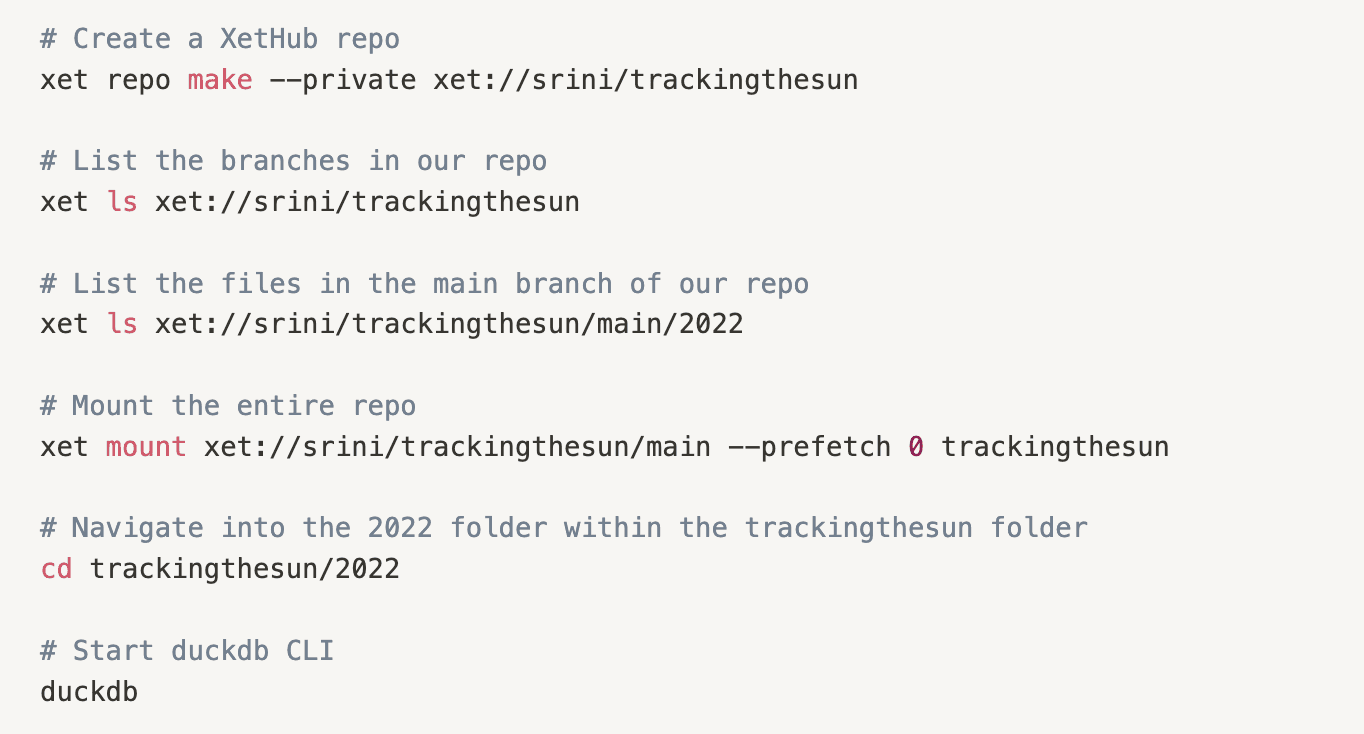
Start by running the following 4 commands, modifying for your use case.
Here's an example code snippet for our username and repo.
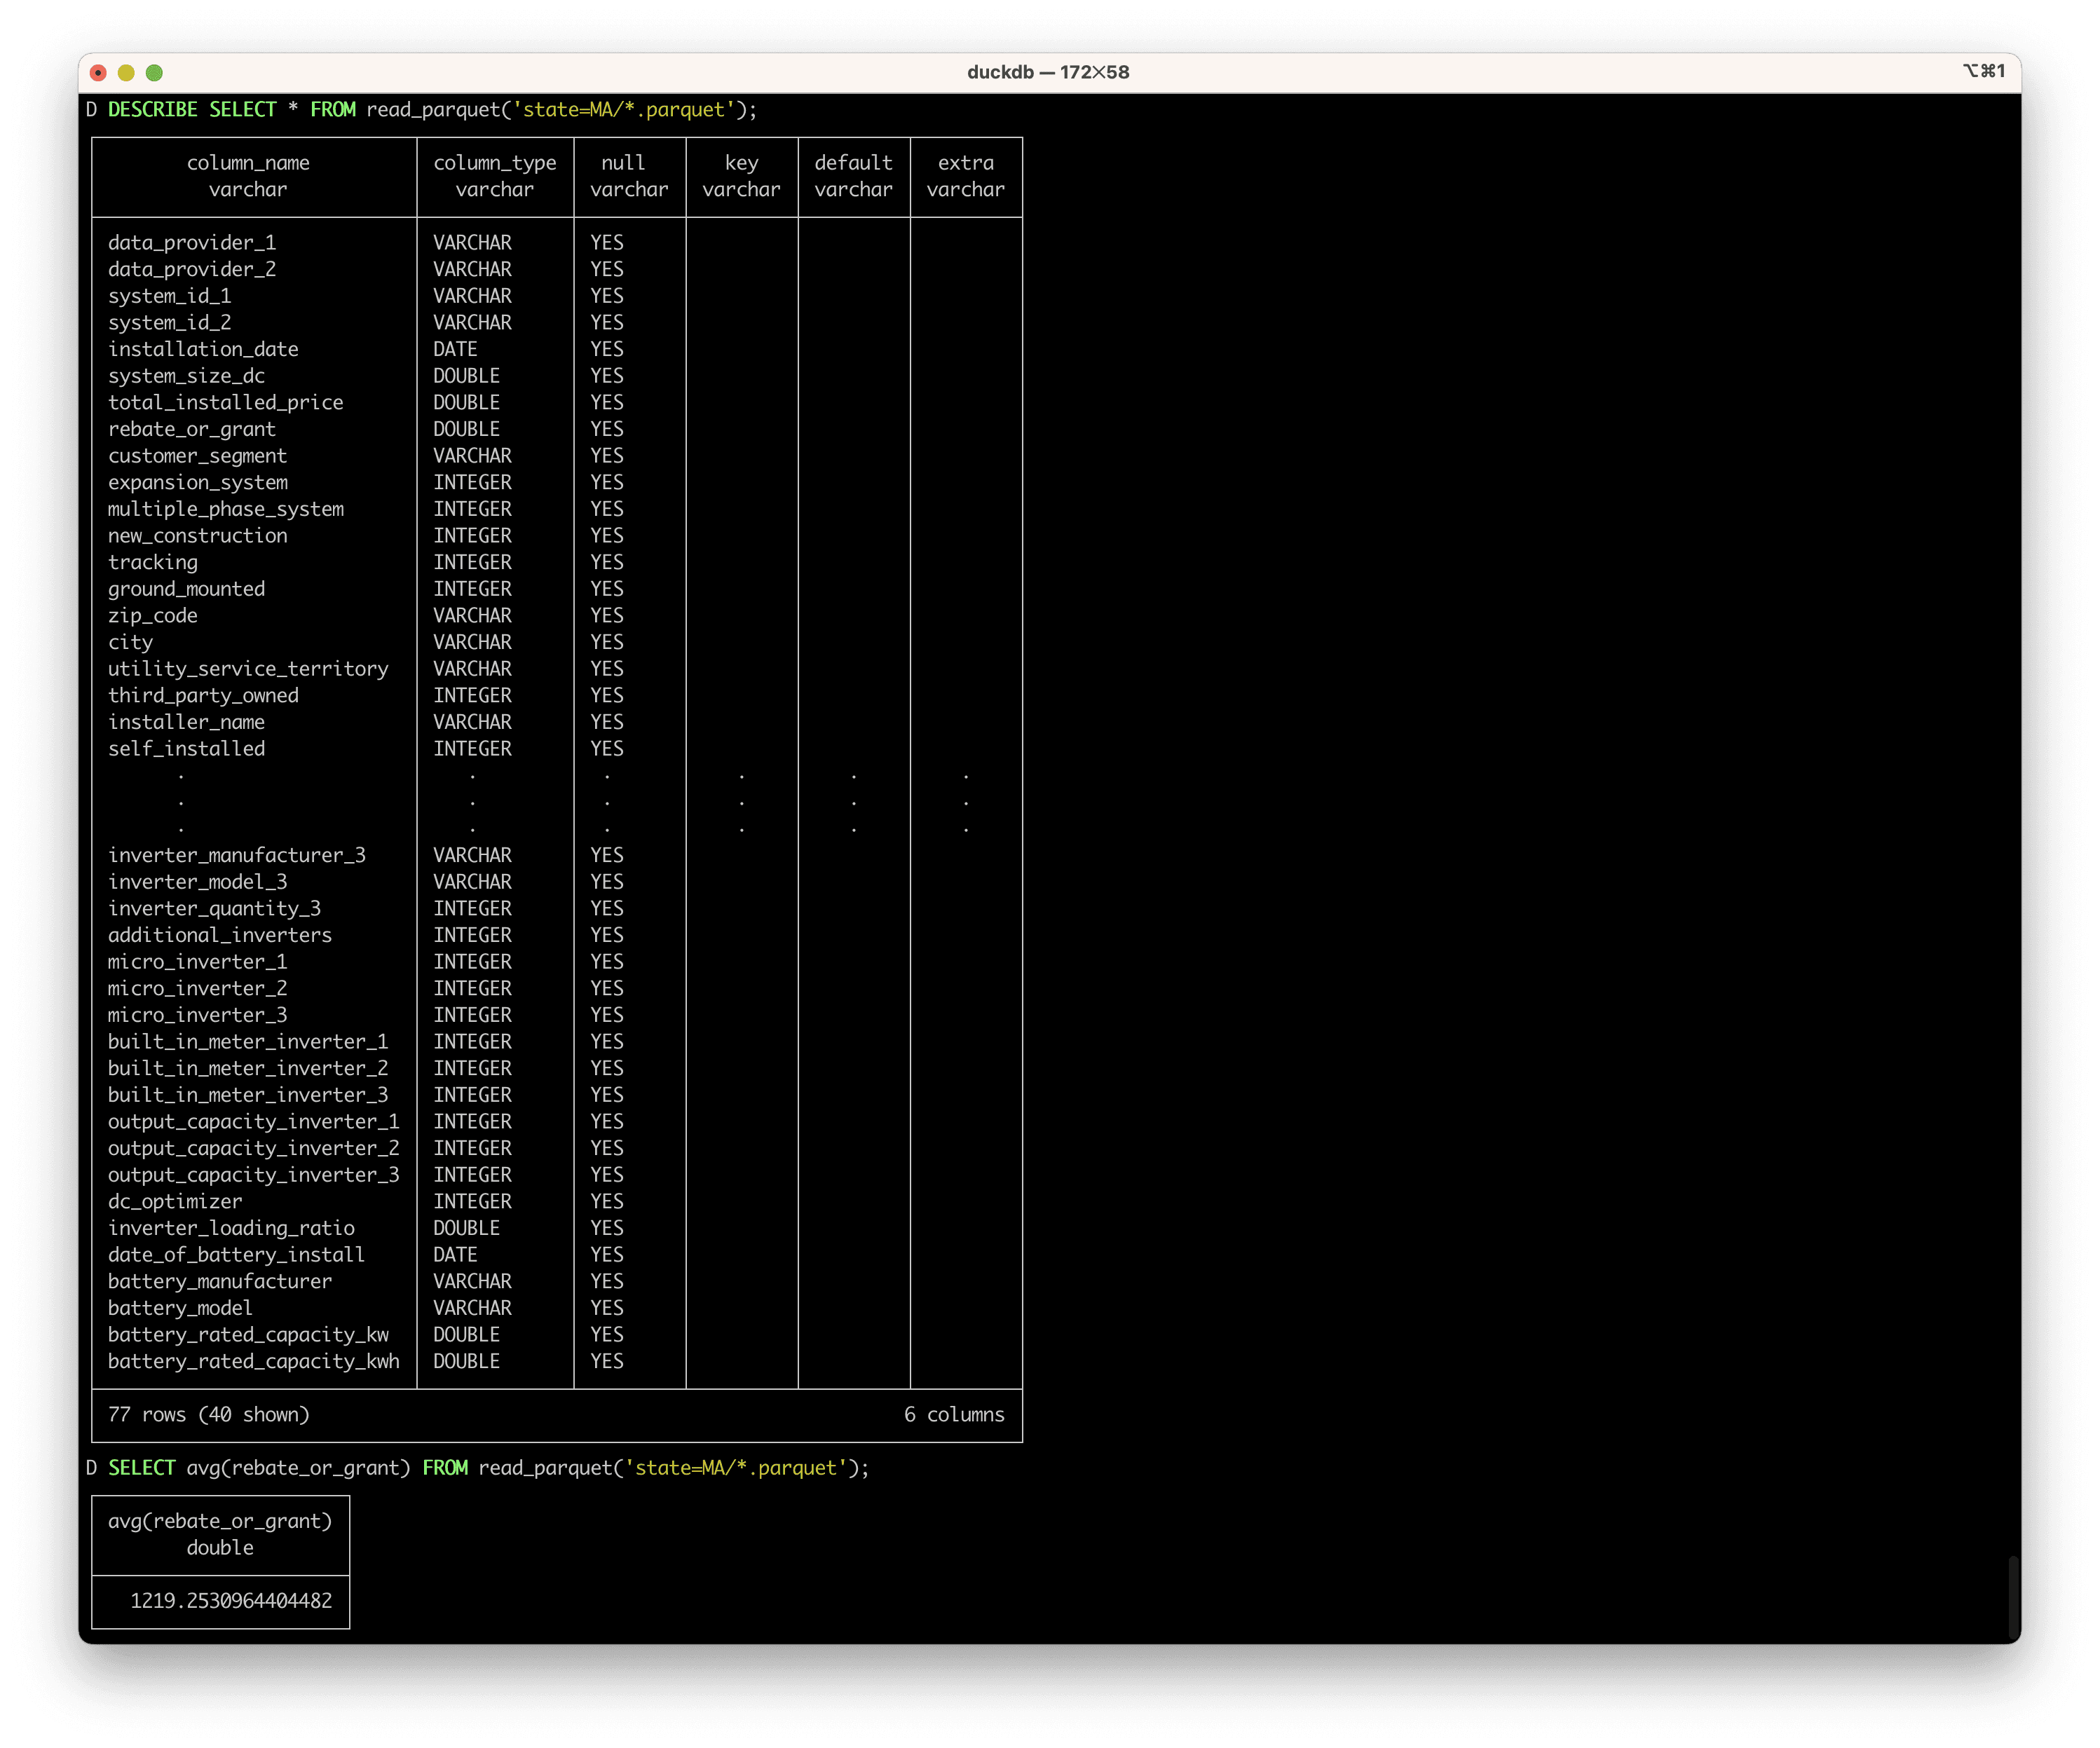
Finally, let’s run queries against the parquet dataset in the Massachusetts folder using duckdb:
Here are the results:
In about 2 minutes, we were able to do all of the following from just the xet command line:
Create a new XetHub repo
Copy a dataset from S3 into a XetHub repo
Mount the new repo
Compute aggregate statistics using duckdb without having to download the data first
Next Steps
In part 2, we’ll showcase the model development workflow in XetHub. We’ll dive into how repo branches, time travel, and data summaries in XetHub. If you have questions or run into issues, join our Slack community to meet us and other XetHub users!
Share on


